DEPRECATED - Import plugin for Craft CMS
Plugin that allows you to import data from CSV files., (*1)
Deprecated
With the release of Craft 3 on 4-4-2018, this plugin has been deprecated. You can still use this with Craft 2 but you are encouraged to use (and develop) a Craft 3 version. At this moment, I have no plans to do so., (*2)
Usage
Importing data is a two step process:, (*3)
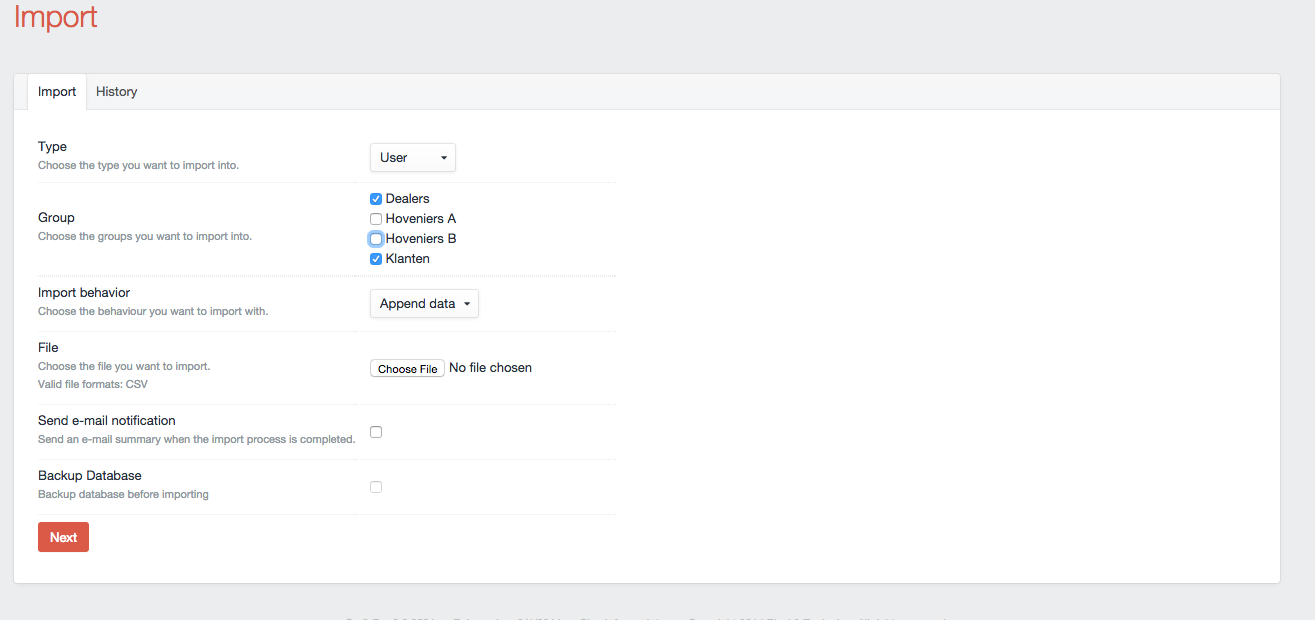
Step 1. Select import options
- Choose the type of element to import (Category, Entry, or User)
- Select the corresponding category group, section, entry type, or user group
- Select the Import Behavior:
- Append Data — Will add new categories, entries, or users.
- Replace Data — Will update data for existing matched categories, entries, or users.
- Delete Data — Will delete data for existing matched categories, entries, or users., (*4)
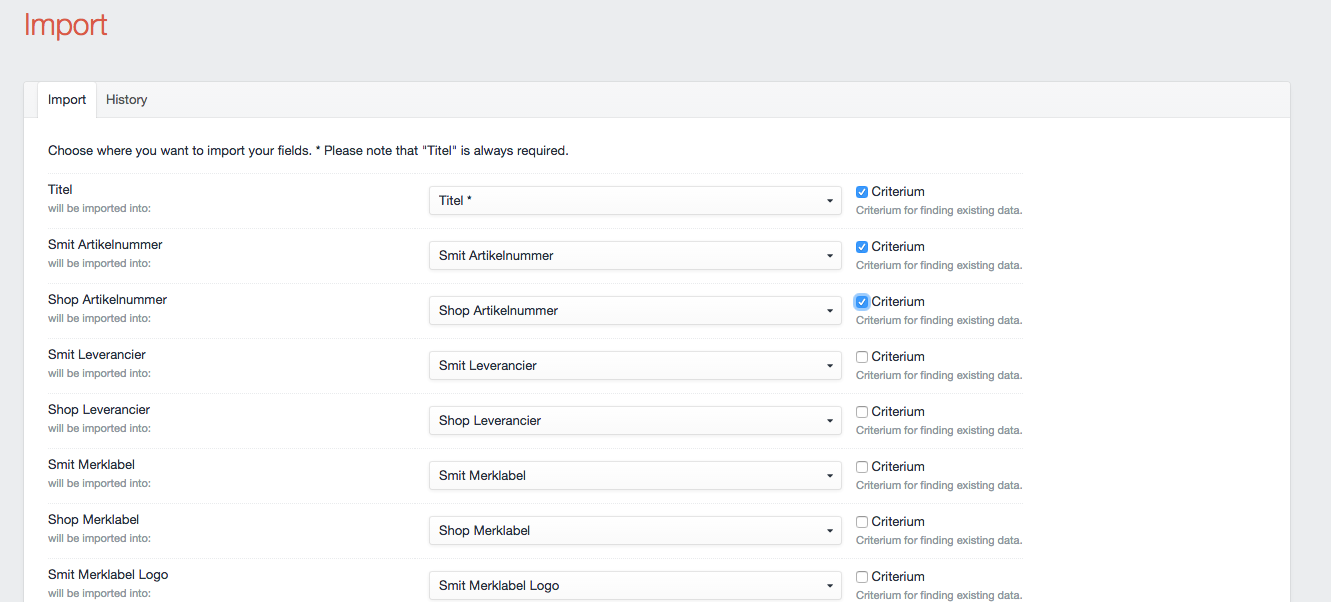
Step 2. Map CSV data
- Map the destination fields for the CSV data.
- Select which fields will be used as criteria to match existing records to replace (update) or delete data., (*5)
And import!, (*6)
Features
- Import Entries, Users and Categories
- Map CSV columns onto Fields
- Append, replace or delete data
- When replacing or deleting, you can build your own criteria for finding
- Has a hook "registerImportOperation" to parse special field type inputs if you want.
- Has a hook "registerImportOptionPaths" to allow special field types to have a custom option (or options) in the mapping select menu.
- Has a hook "modifyImportRow" to allow special field types to customize data just before it gets imported.
- Has events "onImportFinish" and "onBeforeImportDelete"
- These will notify you when the import finishes or wants to delete an element
- Uses the Task service to import while you work on.
- Automatically detects CSV delimiters
- Will connect Entries (also Structures), Categories, Users and Assets by searching for them
- Will send a summary email when the task if finished
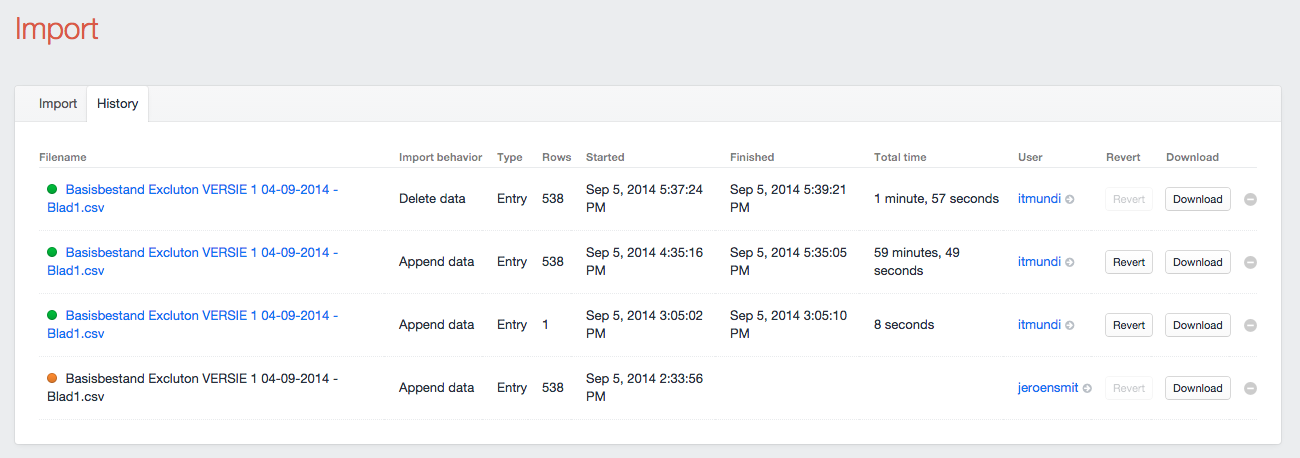
- View your import history
- Ability to revert imports
Roadmap
- Import more ElementTypes (Tags, Globals, Assets?) (0.8)
- Support JSON and XML (0.9)
Important:
The plugin's folder should be named "import", (*7)
Frequently Asked Questions
- How do I indicate an element field type in the CSV file?
- Import utilizes "search", so it can be anything that makes it unique
- How would I indicate a multiplicity of element field types in the CSV file?
- Just separate them by comma
- How should I write my CSVs so parent & child entries/categories work properly?
- Write it like Ancestor/Child/Entry and connect as "Ancestor". Do note that "Entries in this section have their own URLs" should be checked.
- Do parent entries already need to exist before I import a CSV? Or can they be created form the came CSV import as their child entries?
- The entry should exist, but if it comes in the row before then it will exist and it will pass.
- Is there an "Export" feature so I can get to data that is more complete in the DB than in my CSV file?
- No, but there is the "Export" plugin that can be found here: https://github.com/boboldehampsink/export
Screenshots
History
 , (*8)
Upload (entries)
 , (*9)
Upload (users)
 , (*10)
Map fields
 , (*11)
Hooks
modifyImportRow
Manipulate the data as the import is running. You'll be able to tweak your data just before it goes into the database., (*12)
This code example is a good starting point:, (*13)
/**
 * Modify data just before importing
 *
 * @param BaseElementModel $element  The current element receiving import data.
 * @param array            $map      Mapping of data between CSV -> Craft fields.
 * @param array            $data     Raw data provided for this row.
 */
public function modifyImportRow($element, $map, $data)
{
    // Map data to fields
    $fields = array_combine($map, $data);

    // Initialize content array
    $content = array();

    // Arrange your content in a way that makes sense for your plugin
    foreach ($fields as $handle => $value) {
        $content[$handle] = $value;
    }

    // Set modified content
    $element->setContentFromPost($content);
}
The foreach loop is probably where you'll do the most customizing. However, feel free to edit any (or all) of this method to achieve your desired results., (*14)
registerImportOptionPaths
Prep the field mapping before the import is run. This allows you to customize the <select> menu option(s) for your field., (*15)
When you are mapping your CSV columns to Craft fields, Import let's you choose which field you want to assign your data to. There is a <select> menu with a list of Craft fields, and you select the destination for each column., (*16)
The purpose of this hook is to give you the opportunity to replace the standard <option> tag with something custom. In essence, you are providing a template which contains a custom <option> (or multiple options) to handle the data mapping in a way that is more preferable for your field type., (*17)
Put this in your main MyPlugin.php file, and edit accordingly:, (*18)
/**
 * For custom field types, replace default <option> with custom HTML
 *
 * @return array  Mapping between custom field type -> custom <option> template
 */
public function registerImportOptionPaths()
{
    return array(
        'MyPlugin_MyFieldType' => 'myplugin/customImportOption.html',
    );
}
You are being given the opportunity to say "for fields of this type, use my custom template in place of the default <option> tag". Make sure your customImportOption.html template outputs one or more <option> tags... They will be injected into the field select dropdown menu., (*19)
In summary:, (*20)
- Create a short template to replace the default
<option>
- Map that template to your field type with this hook
If you want to dig in the code a little more and see how it works in even greater detail, check out this chunk of code here..., (*21)
 Wallogit.com
