Summary


 , (*1)
This repo is to help developers to easily understand how to do feature tests with Behat, and to start writing feature
tests for REST APIs, with following features included:, (*2)
- Core contexts/steps for testing REST APIs.
- Sample RESTful services, and sample feature tests against the services.
- Best of all: To start writing feature tests for the project you are working on, you may use this repo in your project
via Composer if you happen to use Composer to manage 3rd-party libraries.
NOTE: Following instructions focus on Behat 3.0.6+ and PHP 5.4+. If you use Behat 2.x and/or PHP 5.3 (5.3.3+),
please check branch "1.x" for details., (*3)
Dependencies
Branch master
Branch 1.x (old releases for Behat 2.x)
Installation - Source
You will need to download Composer and run the install command under the same directory where the 'composer.json'
file is located:, (*4)
curl -s http://getcomposer.org/installer | php && ./composer.phar install
Installation - Composer
You may also install using Composer if you want to use this repo in your own
project., (*5)
Step 1. Add the repo as a dependency., (*6)
"require": {
    "deminy/behat-rest-testing": "~3.0.0"
}
NOTE: This is for running with Behat 3 only. If you use Behat 2.x, please check
installation instructions for v1.x for details., (*7)
Step 2. Run Composer: php composer.phar install., (*8)
How to Test
1. Set up and run REST API server.
You can have a virtual host set up under Apache, with DocumentRoot set to "www/" of this repo and DirectoryIndex set
to "router.php". Please make sure that module mod_rewrite is enabled, otherwise the REST server won't be able to handle
requests properly. You may also need to update option "base_url" in the configuration file "behat.yml"., (*9)
Alternatively, you may consider to use the
PHP 5.4+ built-in web server., (*10)
To start the REST API server using PHP 5.4+ built-in web server, please run command similar to following:, (*11)
php -S localhost:8081 www/router.php
The web server now serves as the REST API server. You can visit URL http://localhost:8081 to see if the server runs
properly or not (If everything is good, the URL should return string "OK" back)., (*12)
2. Create the configuration file "behat.yml" (optional).
For the sample test provided, you can create the file by copying directly from file "behat.yml.dist" without any
modifications required., (*13)
Note that you don't have to do this if you prefer to use file "behat.yml.dist" directly., (*14)
3. Run the test command.
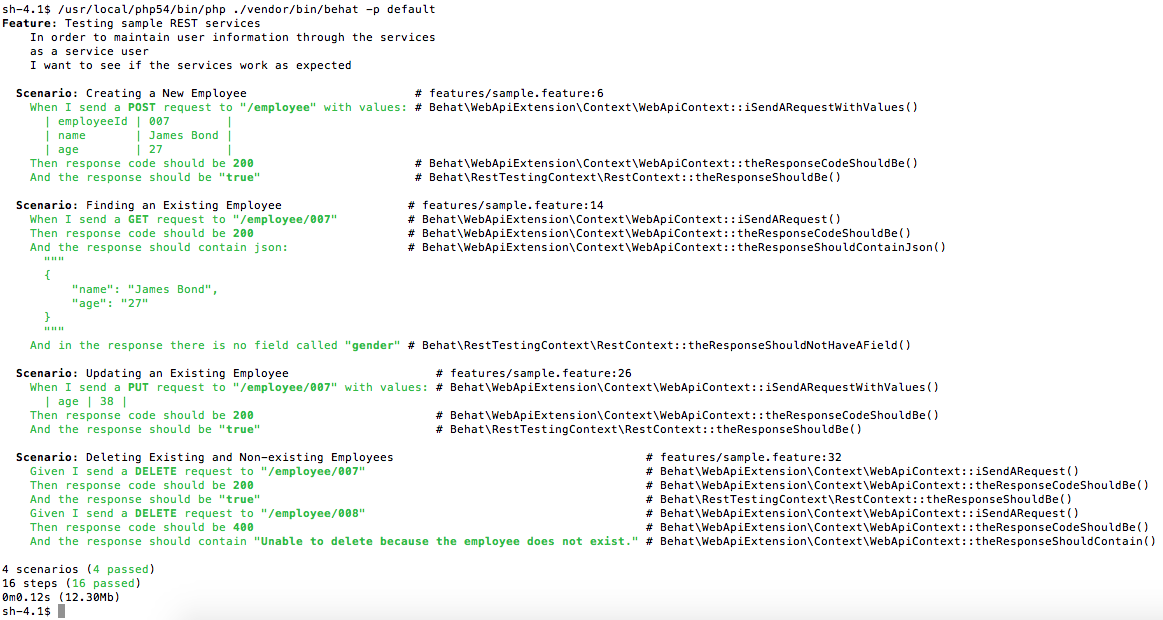
Now, run following command to test sample features:, (*15)
./vendor/bin/behat
# OR
./vendor/bin/behat -p default # explicitly to use profile "default"
If everything is good, you should see the output as in following screenshot:, (*16)
 , (*17)
TODOs
- Support different environments (development, QA, staging, production, etc).
License
MIT license., (*18)
 Wallogit.com
